A Look at the Steps of Making Wine
 If you are a wine lover, the next step in appreciating a great bottle of wine may be to make your own wine at home. While the process may seem to be complicated, wine can be made easily at home. Before beginning the process of making your own wine at home it is important to understand the basic steps of wine making.
The general process begins with taking the juice of a fruit (grapes or other fruits) and introducing yeast that multiply and turn the sugars found in juice into alcohol. This process happens in a remarkably short amount of time but there are a number of factors that go into making a good bottle of wine.
In order to make wine at home you will need either grapes, grape juice or grape concentrate. If you have a sufficient growing area and your climate is appropriate for its growth, you may choose to grow your own grapes and make wine from that. If you choose to use grape juice or concentrate, keep in mind that you will need to use high quality base to get a good bottle of wine. The quality of the wine is highly dependent on the quality of the grape juice. You can purchase your juice online or in local wine and home brewing stores.
In addition to your base ingredient, you will need yeast and brewing equipment. If this is your first batch of wine you may wish to consider purchasing a wine making kit rather than buying all of your equipment separately. An equipment kit is relatively inexpensive and will provide you with everything you need to experiment with making wine at home and decided whether it is an endeavor you wish to continue. Likely you might then begin accumulating various pieces of equipment later but all of your kit components will still be used down the road.
There are five to eight basic steps involved in the process of making wine, depending on whether you are using grapes or concentrate. If you are using grapes then the fruit will obviously need to be harvested first. After the grapes have been harvested, you will then need to remove the stems from the grapes. This is known as destemming and it is a necessary step as tannins are contained in the stems that can have a heavy influence on the wine.
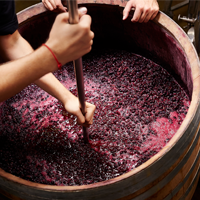
After the stems have been removed, the skins of the grapes are broken in order to release the juice from the fruit. There are certainly many different ways in which to do this. Crushing is the preferred method for most winemakers. The degree to which the fruit is crushed will have an impact on the resulting wine. If your goal is to create a wine that has a fruity aroma then you may wish to leave the berries almost completely intact, lightly crushing to allow the release of juice.
The next step is known as the primary fermentation. During this step the yeast cells which are naturally found in grape juice will feed on the sugars. Alcohol and carbon dioxide is produced as a result. In most cases, you may wish to add additional wine yeast. This helps to ensure a stable and consistent conversion which may not be the case if you rely solely on the yeast that is found on the fruit itself.
After the primary fermentation, more juice will need to be extracted from the fruit. It should be noted that the juice that is extracted in this step is typically not as high of a quality as the juice that is extracted during the crushing phase but still good. This is because the juice that is obtained during crushing, known as free run juice, has had less contact with the stems and skins. The grapes are pressed to remove the remaining juice and separate it from the grape skins.
Note: If your base is from a wine kit or concentrate, the manufacturer has taken the steps to destem and press your juice. It typically comes to you in a food grade bag or perhaps a can. Water is added to the concentrated juice to bring it up to the total volume as per the instructions that are included.
A secondary fermentation occurs after the pressing, at the same time as the wine is aging. As the winemaker, it will be up to you to determine how long the wine should ferment. Most often the wine is fermented to ‘dry’ meaning that all of the sugars have been converted to alcohol. The hydrometer is the tool that is used most often to measure alcohol content.
Blending is an optional part of the process; however, one which can assist you in creating a highly customized wine. Blending is most commonly used in order to improve two or more batches which may be slightly lacking.
During the time between fermenting the juice into wine and bottling, the wine is allowed to age. This process will allow flavors to blend and wine to develop. Prior or during this time additives may be added to clarify the wine or preserve it. Small batch wine makers will age their wine in glass carboys or small oak barrels. If the winemaker wants to give the wine some oak characteristics that can be accomplished in the glass carboy using oak products such as oak cubes or spirals, toasted to various degrees.
The last step of the process is bottling. The wine is transferred into bottles by gravity or pump. Finally, the bottle of wine is sealed with a cork. Likely you will add a label. Once bottled, it is recommended that you continue with the aging process in the bottle for a period of time before you consume the wine. There is something called ‘bottle shock’ that can upset the delicate balance of a wine at bottling time. A rest of 30-90+ days will allow the wine to settle.
Making wine at home can be a very enjoyable experience. As you learn more about the process of making wine, you will likely gain a more thorough appreciation of wine. Our website is dedicated to provide some of the details that will help you to make a great bottle of wine.

